That is what my comments are going to be... dear HaloScan decided to bail and become Echo something or another...
I now need to recover all my comments from wayback! Eish!
Apologies while I figure out how to restore it all...
Update! 25 April 2010
Well I have started by activating a new layout, will slowly modify it to get all the old stuff back over the next few weeks.
So far comments are working...
Showing posts with label blogrolls. Show all posts
Showing posts with label blogrolls. Show all posts
Wednesday, April 07, 2010


Tuesday, February 09, 2010
FAQ for Bloggers
I started a blog on "how to" way back in 2007 but as I only had 2 posts I am now taking down that blog... here was/is the contents;
Post 1
I frequently get asked "How do you do that on your blog?" so I thought it was about time to put my Blog Bashing Guide together.
Feel free to ask a question, I will get to it sometime and try and point you to the right place or put a Bash Guide together to explain the steps to take.
I will use this and my next postings to explain how to add elements etc.
Post 2
This is assuming that you are using the new version of blogger with Customise option. You may want to click on each image to make it clear/larger as to see what I am talking about.
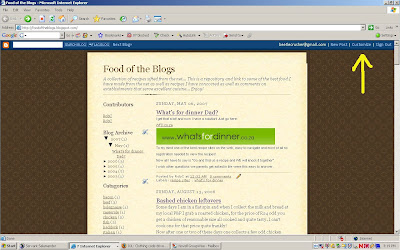 Step 1 - After logging in to your blog you will see a link named Customise, this will open the Template Editor when you click on it, shown by my crude yellow arrow on the top right.
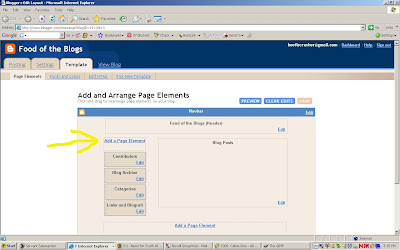 Step 2 - Once you click on Customise the Template Editor will open, you will notice that there may be several places where it says Add a Page Element, as you want to add a blogroll to the side of your layout chose that part by clicking on that particular Add a Page Element link.
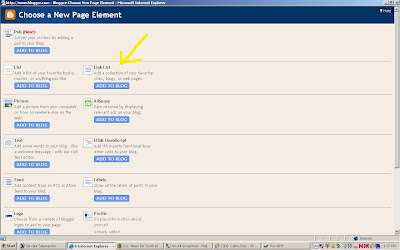 Step 3 - A new window will open with a whole lot of things to select, as we want a Link List click on that elements Add To Blog link.
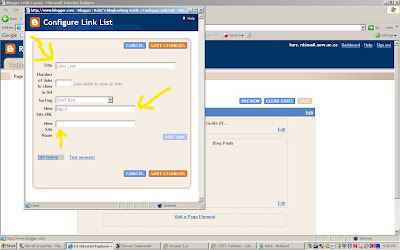 Step 4 - Now we have to add a header for your list and put some links in it, the header can be added in the Title input field. The link name is added in the New Site Name input field. The URL is added in New Site URL input field. All indicated by the yellow arrows. Once this is done you click on Add Link. The link will be set up and you may then add the next or click on Save Changes. Then click on View Blog to see how it looks in real life...
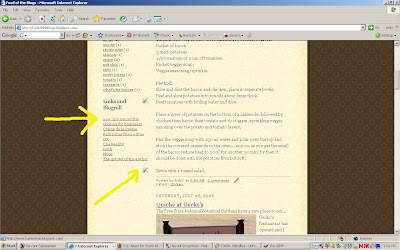 You will now see your Blogroll with the title you gave it and the links you added, you can edit any element on your blog by using the Wench/Screwdriver icon.
Hereendiththelesson. Enjoy and feel free to ask more questions.
"An archive of answers to questions most commonly asked by new users -- therefore reducing the number of repeated questions."
Post 1
I frequently get asked "How do you do that on your blog?" so I thought it was about time to put my Blog Bashing Guide together.
Feel free to ask a question, I will get to it sometime and try and point you to the right place or put a Bash Guide together to explain the steps to take.
I will use this and my next postings to explain how to add elements etc.
Post 2
This is assuming that you are using the new version of blogger with Customise option. You may want to click on each image to make it clear/larger as to see what I am talking about.
 Step 1 - After logging in to your blog you will see a link named Customise, this will open the Template Editor when you click on it, shown by my crude yellow arrow on the top right.
 Step 2 - Once you click on Customise the Template Editor will open, you will notice that there may be several places where it says Add a Page Element, as you want to add a blogroll to the side of your layout chose that part by clicking on that particular Add a Page Element link.
 Step 3 - A new window will open with a whole lot of things to select, as we want a Link List click on that elements Add To Blog link.
 Step 4 - Now we have to add a header for your list and put some links in it, the header can be added in the Title input field. The link name is added in the New Site Name input field. The URL is added in New Site URL input field. All indicated by the yellow arrows. Once this is done you click on Add Link. The link will be set up and you may then add the next or click on Save Changes. Then click on View Blog to see how it looks in real life...
 You will now see your Blogroll with the title you gave it and the links you added, you can edit any element on your blog by using the Wench/Screwdriver icon.
Hereendiththelesson. Enjoy and feel free to ask more questions.
"An archive of answers to questions most commonly asked by new users -- therefore reducing the number of repeated questions."
Subscribe to:
Posts (Atom)
